Media Library
Page summary:
Media Library centralizes all uploaded assets with search, filters, and folder organization. This documentation includes provider options, upload workflows, and explanations on inserting media into content.
The Media Library is the Strapi feature that displays all assets uploaded in the Strapi application and allows users to manage them.
Configuration
Some configuration options for the Media Library are available in the admin panel, and some are handled via your Strapi project's code.
Admin panel configuration
In the admin panel, some Media Library settings are available via the Global Settings to manage the format, file size, and orientation of uploaded assets. It is also possible, directly via the Media Library to configure the view.
Configuring settings
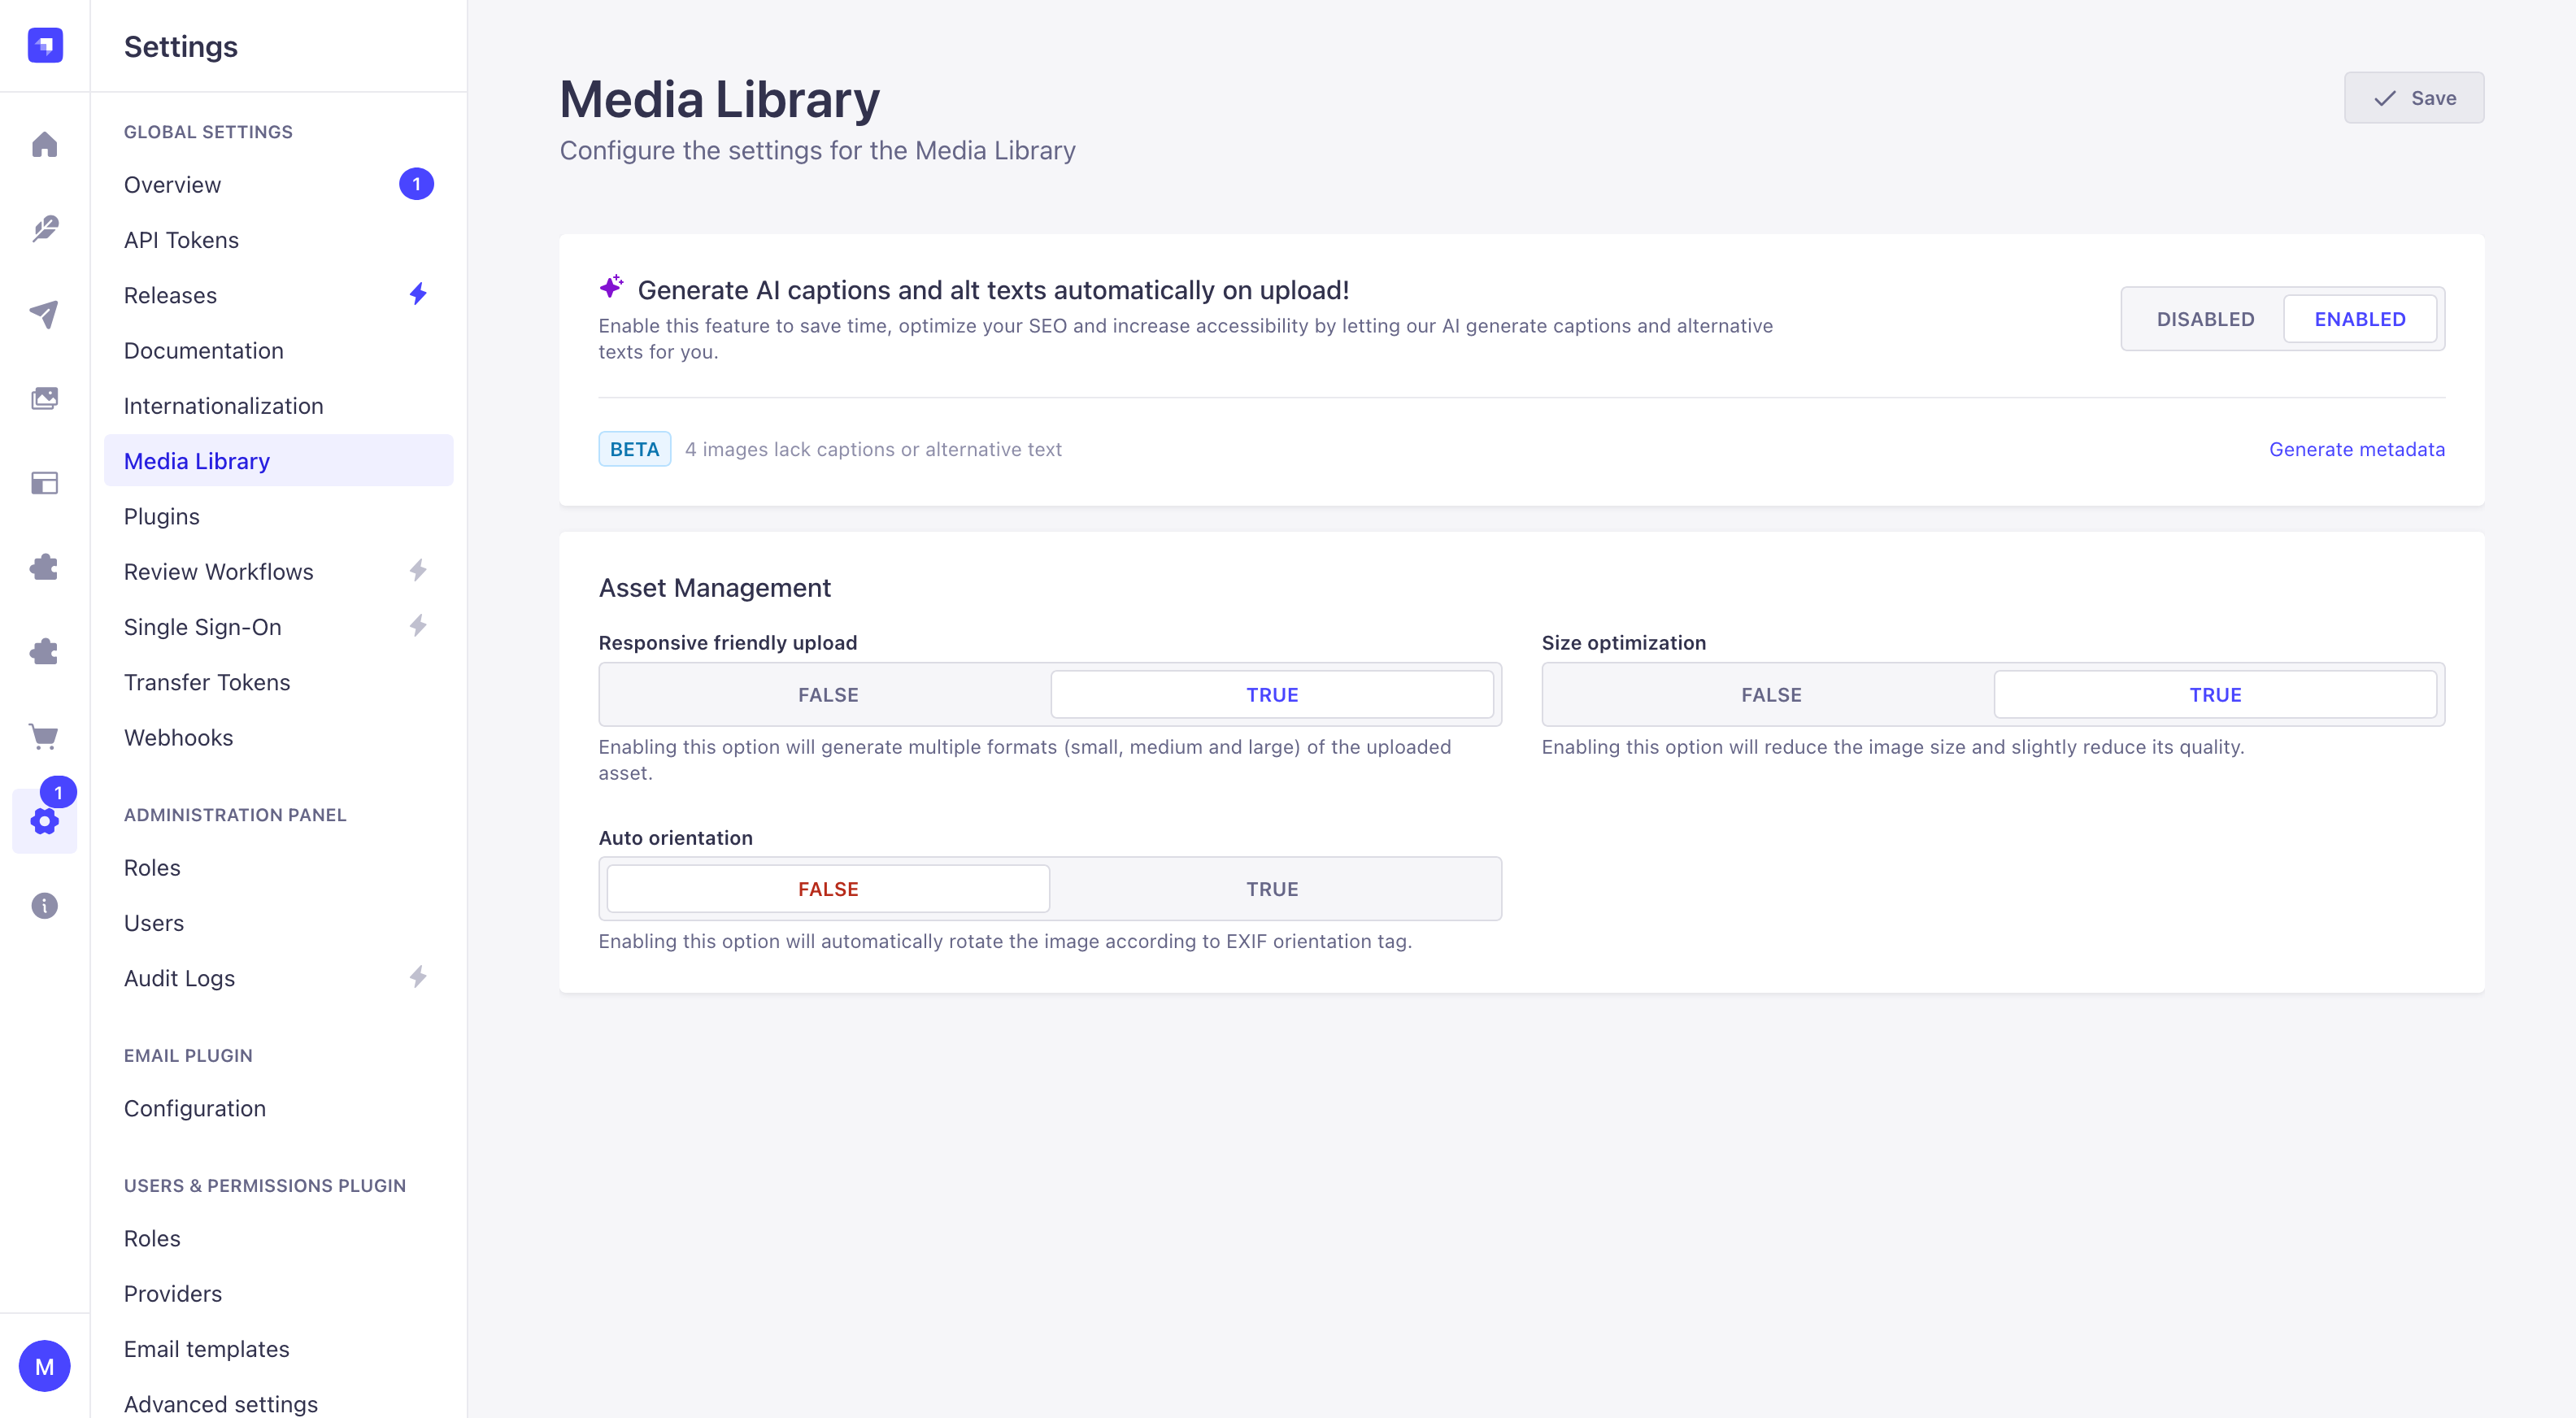
Path to configure the feature: Settings > Global Settings > Media Library.
-
Define your chosen new Media Library settings:
Setting name Instructions Default value Generate AI captions and alt texts automatically on upload! Enabling this option will turn on AI‑powered metadata generation GrowthThis feature is available with a Growth plan. True Responsive friendly upload Enabling this option will generate multiple formats (small, medium and large) of the uploaded asset.
Default sizes for each format can be configured through the code.True Size optimization Enabling this option will reduce the image size and slightly reduce its quality. True Auto orientation Enabling this option will automatically rotate the image according to EXIF orientation tag. False -
Click on the Save button.


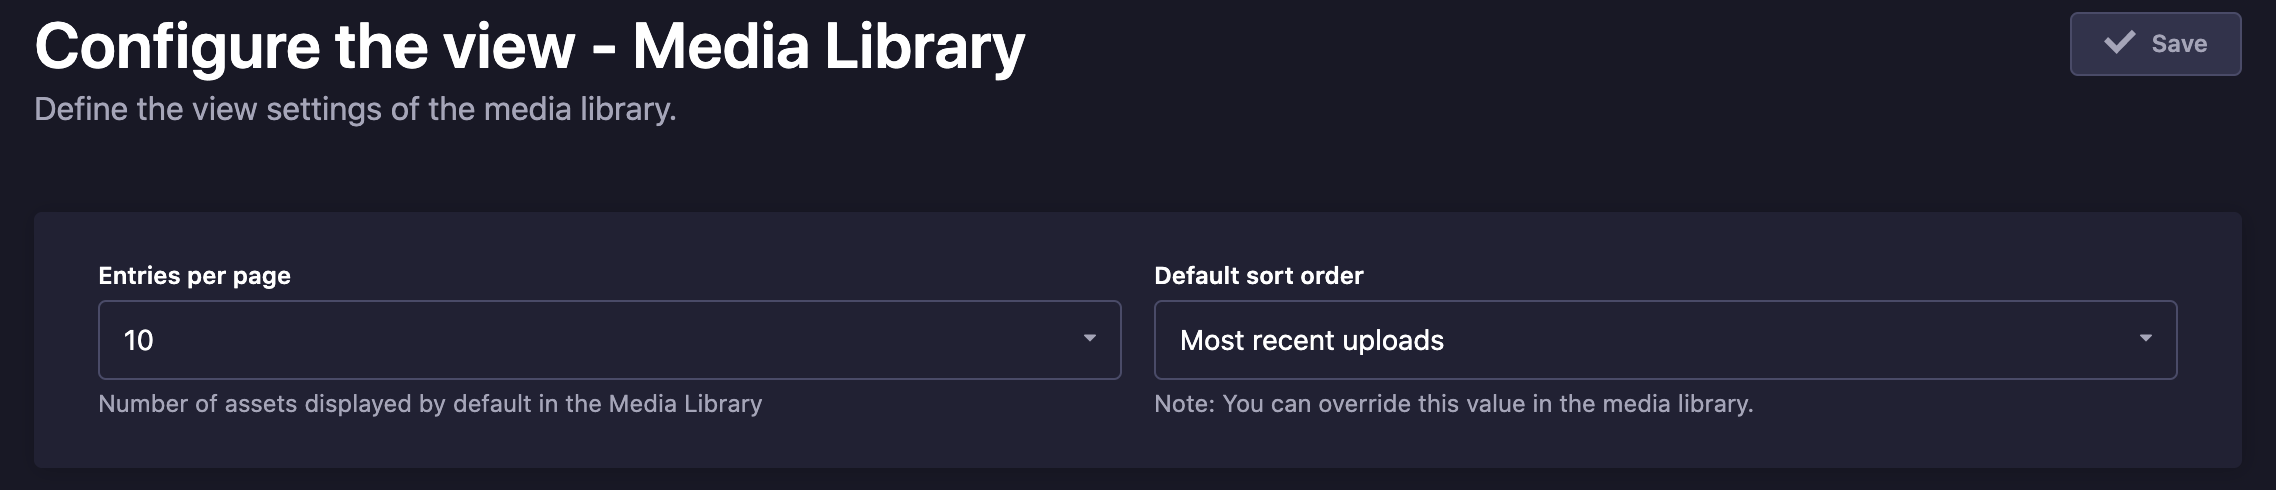
Configuring the view
Path to configure the feature: Media Library
- Click on the button just above the list of folders and assets, on the right side of the interface.
- Configure the Media Library view, following the instructions below:
Setting name Instructions Entries per page Use the dropdown to define the number of assets displayed by default per page. Default sort order Use the dropdown to define the default order in which assets are displayed. This can be overriden when sorting assets in the Media Library.
Both settings are used as the defaults in the Media Library and in the Content Manager's media upload modal. These settings are global across the entire Strapi project for all users.

Code-based configuration
The Media Library is powered in the backend server by the Upload package, which can be configured and extended through providers.
Providers
The providers maintained by Strapi are the following. Clicking on a card will redirect you to a docs page with a configuration example:
Amazon S3
Official provider for file uploads to Amazon S3.
Cloudinary
Official provider for media management with Cloudinary.
Local
Default provider for storing files locally on the server.
If you need to install other providers or create your own, please refer to the following guide:
Code-based configuration instructions on the present page detail options for the default upload provider. If using another provider, please refer to the available configuration parameters in that provider's documentation.
Available options
When using the default upload provider, the following specific configuration options can be declared in an upload.config object within the config/plugins file. All parameters are optional:
| Parameter | Description | Type | Default |
|---|---|---|---|
providerOptions.localServer | Options that will be passed to koa-static upon which the Upload server is build (see local server configuration) | Object | - |
sizeLimit | Maximum file size in bytes (see max file size) | Integer | 209715200(200 MB in bytes, i.e., 200 x 1024 x 1024 bytes) |
breakpoints | Allows to override the breakpoints sizes at which responsive images are generated when the "Responsive friendly upload" option is set to true (see responsive images) | Object | { large: 1000, medium: 750, small: 500 } |
sharp | Configures sharp image processing options (see sharp configuration) | Object | { cache: false, concurrency: 1 } |
security | Configures validation rules for uploaded files to enhance media security | Object | - |
concurrentUploadSize | Maximum number of files processed in parallel during a bulk upload. Increase for faster bulk uploads at the cost of higher memory usage. Must be an integer >= 1. | Integer | 1 |
The Upload request timeout is defined in the server options, not in the Upload plugin options, as it's not specific to the Upload plugin but is applied to the whole Strapi server instance (see upload request timeout).
If you wish to override the image function to generate custom file names, please refer to the Plugins extension documentation.
Example custom configuration
The following is an example of a custom configuration for the Upload plugin when using the default upload provider:
- JavaScript
- TypeScript
module.exports = ({ env })=>({
  upload: {
    config: {
      providerOptions: {
        localServer: {
          maxage: 300000
        },
      },
      sizeLimit: 250 * 1024 * 1024, // 256mb in bytes
      breakpoints: {
        xlarge: 1920,
        large: 1000,
        medium: 750,
        small: 500,
        xsmall: 64
      },
      sharp: {
        cache: true,
        concurrency: 4,
      },
      security: {
        allowedTypes: ['image/*', 'application/*'],
        deniedTypes: ['application/x-sh', 'application/x-dosexec']
      },
      concurrentUploadSize: 5,
    },
  },
});
export default () => ({
  upload: {
    config: {
      providerOptions: {
        localServer: {
          maxage: 300000
        },
      },
      sizeLimit: 250 * 1024 * 1024, // 256mb in bytes
      breakpoints: {
        xlarge: 1920,
        large: 1000,
        medium: 750,
        small: 500,
        xsmall: 64
      },
      sharp: {
        cache: true,
        concurrency: 4,
      },
      security: {
        allowedTypes: ['image/*', 'application/*'],
        deniedTypes: ['application/x-sh', 'application/x-dosexec']
      },
      concurrentUploadSize: 5,
    },
  },
})
Local server
By default Strapi accepts localServer configurations for locally uploaded files. These will be passed as the options for koa-static.
You can provide them by creating or editing the /config/plugins file. The following example sets the max-age header:
- JavaScript
- TypeScript
module.exports = ({ env })=>({
  upload: {
    config: {
      providerOptions: {
        localServer: {
          maxage: 300000
        },
      },
    },
  },
});
export default ({ env }) => ({
  upload: {
    config: {
      providerOptions: {
        localServer: {
          maxage: 300000
        },
      },
    },
  },
});
Max file size
The Strapi middleware in charge of parsing requests needs to be configured to support file sizes larger than the default of 200MB. This must be done in addition to provider options passed to the Upload package for sizeLimit.
You may also need to adjust any upstream proxies, load balancers, or firewalls to allow for larger file sizes. For instance, Nginx has a configuration setting called client_max_body_size that must be adjusted, since its default is only 1mb.
The middleware used by the Upload package is the body middleware. You can pass configuration to the middleware directly by setting it in the /config/middlewares file:
- JavaScript
- TypeScript
module.exports = [
  // ...
  {
    name: "strapi::body",
    config: {
      formLimit: "256mb", // modify form body
      jsonLimit: "256mb", // modify JSON body
      textLimit: "256mb", // modify text body
      formidable: {
        maxFileSize: 250 * 1024 * 1024, // multipart data, modify here limit of uploaded file size
      },
    },
  },
  // ...
];
export default [
  // ...
  {
    name: "strapi::body",
    config: {
      formLimit: "256mb", // modify form body
      jsonLimit: "256mb", // modify JSON body
      textLimit: "256mb", // modify text body
      formidable: {
        maxFileSize: 250 * 1024 * 1024, // multipart data, modify here limit of uploaded file size
      },
    },
  },
  // ...
];
In addition to the middleware configuration, you can pass the sizeLimit, which is an integer in bytes, in the /config/plugins file:
- JavaScript
- TypeScript
module.exports = {
  // ...
  upload: {
    config: {
      sizeLimit: 250 * 1024 * 1024 // 256mb in bytes
    }
  }
};
export default {
  // ...
  upload: {
    config: {
      sizeLimit: 250 * 1024 * 1024 // 256mb in bytes
    }
  }
};
Security NewThis content is new.
The Upload plugin validates files based on their actual MIME type rather than the declared file extension. Only files matching the defined security rules are uploaded.
The security configuration provides 2 options: allowedTypes or deniedTypes, which let you control which file types can or cannot be uploaded.
You can use allowedTypes and deniedTypes separately or together to fine-tune which files are accepted. Files must match an allowed type and must not match any denied type. If you use a wildcard like * in allowedTypes, you can narrow down the validation by specifying exceptions in deniedTypes.
You can provide them by creating or editing the /config/plugins file. The following is an example of how to combine allowedTypes and deniedTypes:
- JavaScript
- TypeScript
module.exports = {
  // ...
  upload: {
    config: {
      security: {
        allowedTypes: ['image/*', 'application/*'],
        deniedTypes: ['application/x-sh', 'application/x-dosexec']
      },
    }
  }
};
export default {
  // ...
  upload: {
    config: {
      security: {
        allowedTypes: ['image/*', 'application/*'],
        deniedTypes: ['application/x-sh', 'application/x-dosexec']
      },
    }
  }
};
Upload request timeout
By default, the value of strapi.server.httpServer.requestTimeout is set to 330 seconds. This includes uploads.
To make it possible for users with slow internet connection to upload large files, it might be required to increase this timeout limit. The recommended way to do it is by setting the http.serverOptions.requestTimeout parameter in the config/servers file.
An alternate method is to set the requestTimeout value in the bootstrap function that runs before Strapi gets started. This is useful in cases where it needs to change programmatically—for example, to temporarily disable and re-enable it:
- JavaScript
- TypeScript
module.exports = {

  //...

  bootstrap({ strapi }) {
    // Set the requestTimeout to 1,800,000 milliseconds (30 minutes):
    strapi.server.httpServer.requestTimeout = 30 * 60 * 1000;
  },
};
export default {

  //...

  bootstrap({ strapi }) {
    // Set the requestTimeout to 1,800,000 milliseconds (30 minutes):
    strapi.server.httpServer.requestTimeout = 30 * 60 * 1000;
  },
};
Responsive Images
When the Responsive friendly upload admin panel setting is enabled, the plugin will generate the following responsive image sizes:
| Name | Largest dimension |
|---|---|
| large | 1000px |
| medium | 750px |
| small | 500px |
These sizes can be overridden in /config/plugins:
- JavaScript
- TypeScript
module.exports = ({ env }) => ({
  upload: {
    config: {
      breakpoints: {
        xlarge: 1920,
        large: 1000,
        medium: 750,
        small: 500,
        xsmall: 64
      },
    },
  },
});
export default ({ env }) => ({
  upload: {
    config: {
      breakpoints: {
        xlarge: 1920,
        large: 1000,
        medium: 750,
        small: 500,
        xsmall: 64
      },
    },
  },
});
Breakpoint changes will only apply to new images, existing images will not be resized or have new sizes generated.
Sharp configuration
The sharp option configures the sharp image processing library used for generating responsive image formats. Adjusting these settings can help reduce memory usage during image processing, which is particularly useful for memory-constrained environments.
| Parameter | Description | Type | Default |
|---|---|---|---|
cache | Enables or disables libvips' operation cache. Disabling the cache reduces memory usage. | Boolean | false |
concurrency | Sets the number of threads libvips uses for image processing. Lower values reduce peak memory usage but may slow down processing. | Integer | 1 |
The default values (cache: false, concurrency: 1) are optimized for low memory usage. For environments with more available memory, you can enable caching and increase concurrency to improve image processing performance:
- JavaScript
- TypeScript
module.exports = ({ env }) => ({
  upload: {
    config: {
      sharp: {
        cache: true,
        concurrency: 4,
      },
    },
  },
});
export default ({ env }) => ({
  upload: {
    config: {
      sharp: {
        cache: true,
        concurrency: 4,
      },
    },
  },
});
Usage
Path to use the feature: Media Library
Strapi supports uploading images from the admin panel or programmatically. From the API, you can send a multipart/form-data request to /api/upload with the image file and optional fileInfo metadata for captions and alt text (see REST API documentation for more information).
The Media Library displays all assets uploaded in the application, either via the Media Library itself or via the Content Manager when managing a media field.
Assets uploaded to the Media Library can be inserted into content-types using the Content Manager.
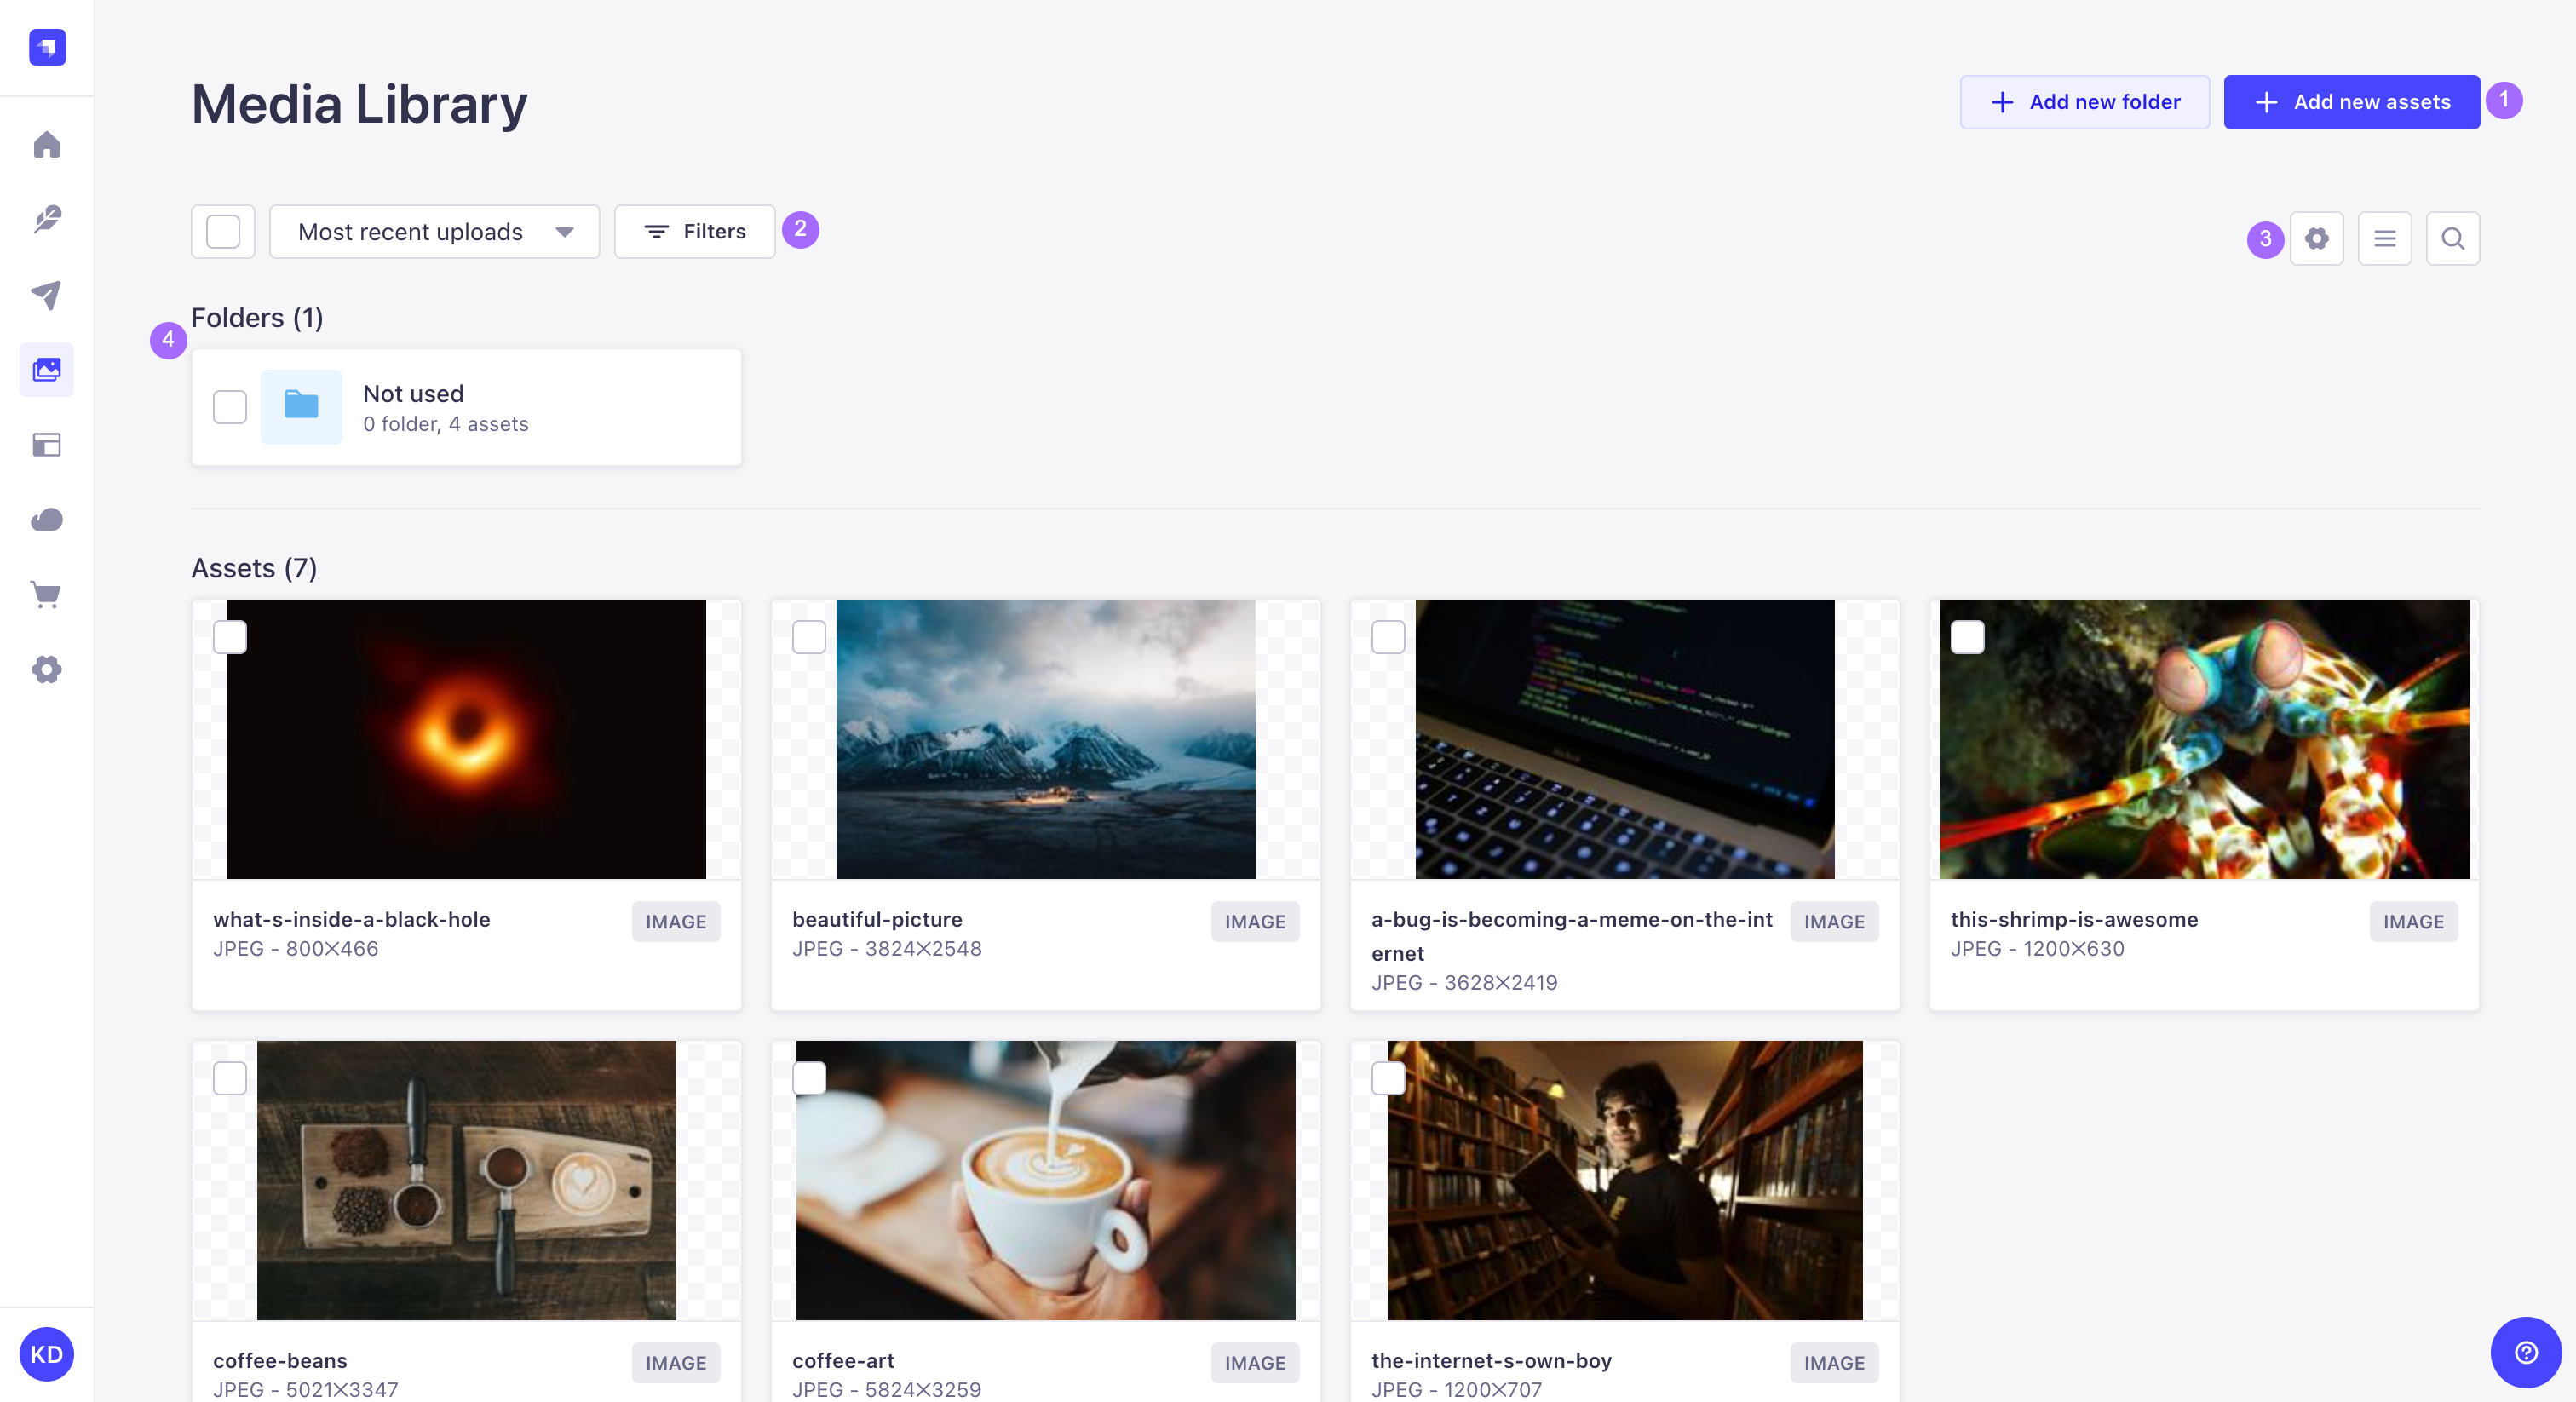
From the Media Library, it is possible to:
- upload a new asset (see adding assets) or create a new folder (see organizing assets with folders) 1,
- sort the assets and folders or set filters 2 to find assets and folders more easily,
- toggle between the list view and the grid view to display assets, access settings to configure the view, and make a textual search 3 to find a specific asset or folder,
- and view, navigate through, and manage folders 4.
Click the search icon on the right side of the user interface to use a text search and find one of your assets or folders more quickly!
Adding assets
List of media types and extensions supported by the Media Library
| Media type | Supported extensions |
|---|---|
| Image | - JPEG - PNG - GIF - SVG - TIFF - ICO - DVU |
| Video | - MPEG - MP4 - MOV (Quicktime) - WMV - AVI - FLV |
| Audio | - MP3 - WAV - OGG |
| File | - CSV - ZIP - XLS, XLSX - JSON |
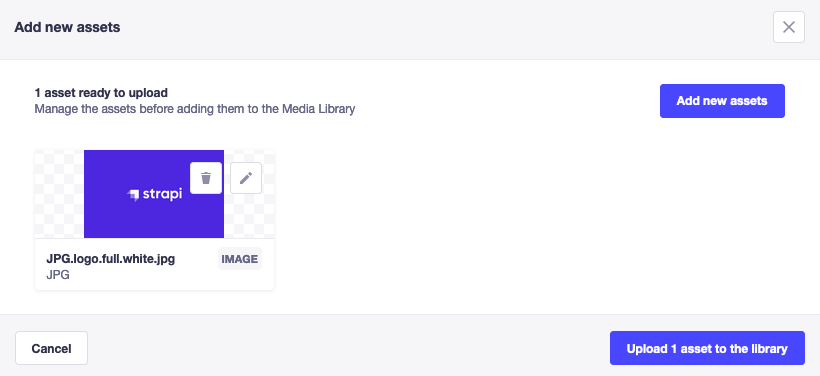
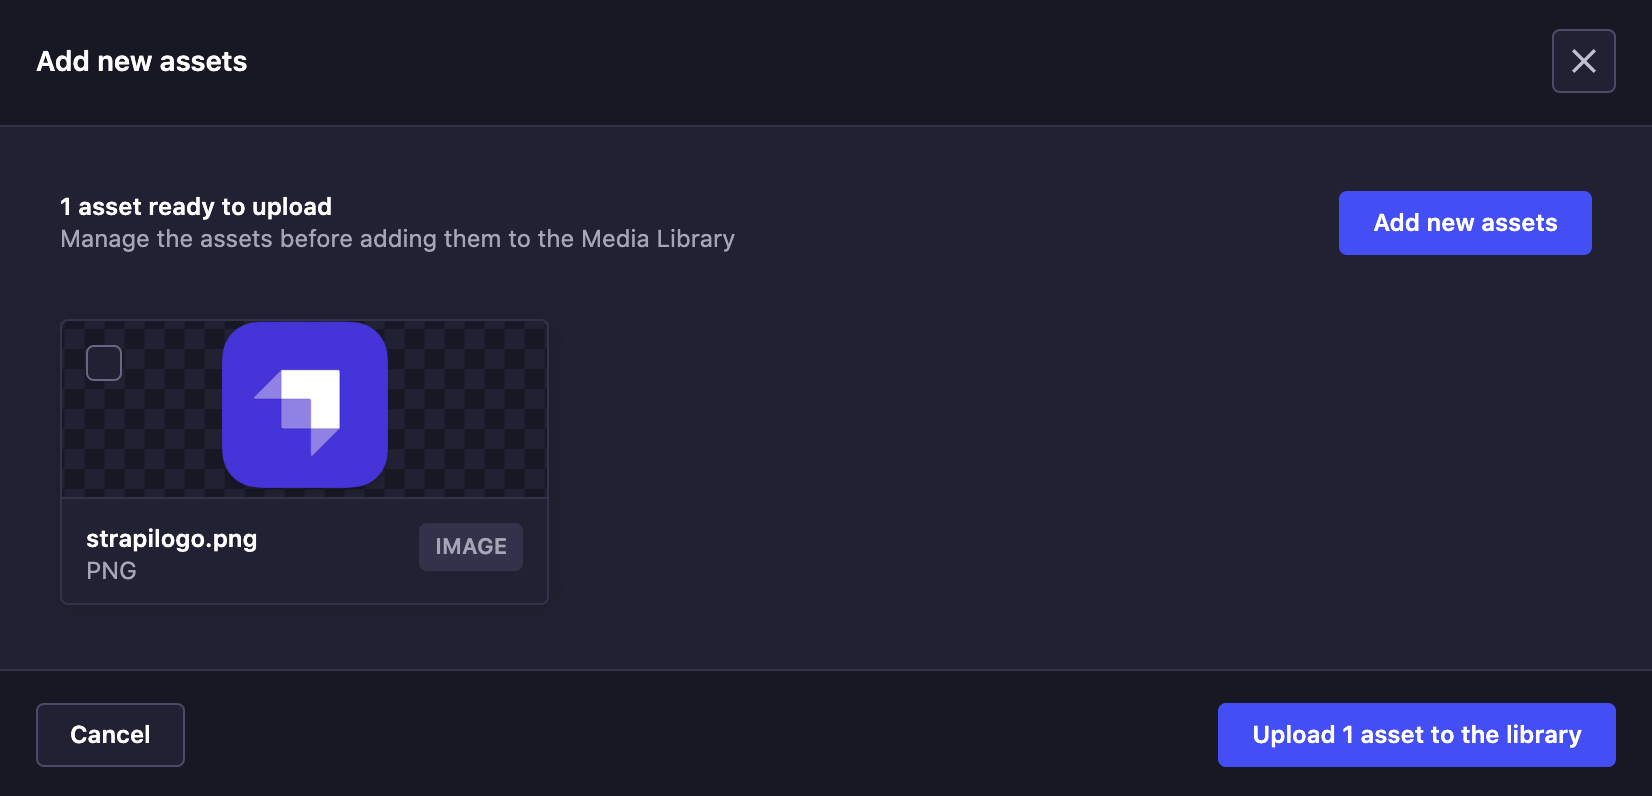
- Click the Add new assets button in the upper right corner of the Media Library.
- Choose whether you want to upload the new asset from your computer or from an URL:
- from the computer, either drag & drop the asset directly or browse files on your system,
- from an URL, type or copy and paste an URL(s) in the URL field, making sure multiple URLs are separated by carriage returns, then click Next.
- (optional) Click the edit button to view asset metadata and define a File name, Alternative text and a Caption for the asset (see Managing individual assets).
- (optional) Add more assets by clicking Add new assets and going back to step 2.
- Click on Upload assets to the library.
Automatically generating metadata with Strapi AI
GrowthThis feature is available with a Growth plan.When enabled, Strapi AI automatically generates alternative text and captions for images uploaded to the Media Library, helping you improve content accessibility and SEO. A modal window displays the AI-generated alternative text and caption, allowing you to review the metadata and modify it if needed:


AI metadata generation only works with images, not files or videos. The feature is enabled by default, but can be disabled in the Media Library settings if needed.
The Media Library settings also allow generating metadata for existing images that lack alternative text or captions. This feature is currently in Beta.
Strapi AI includes 1,000 credits per month on the Growth plan, and 10 free credits during the free trial. Strapi AI is not available on Enterprise plans.
Lightweight actions use fewer credits, while more complex ones use more.
You can check your credit usage in the Settings Overview of the admin panel. Notifications are sent when your usage reaches 80%, 90%, and 100% of your monthly allowance.
When your credits run out, you can keep using Strapi AI, with overages billed monthly.
Managing individual assets
The Media Library allows managing assets, which includes modifying assets' file details and location, downloading and copying the link of the assets file, and deleting assets. Image files can also be cropped.
Editing assets
Click on the edit button of an asset to open up the "Details" window, where all the available asset management options are available.
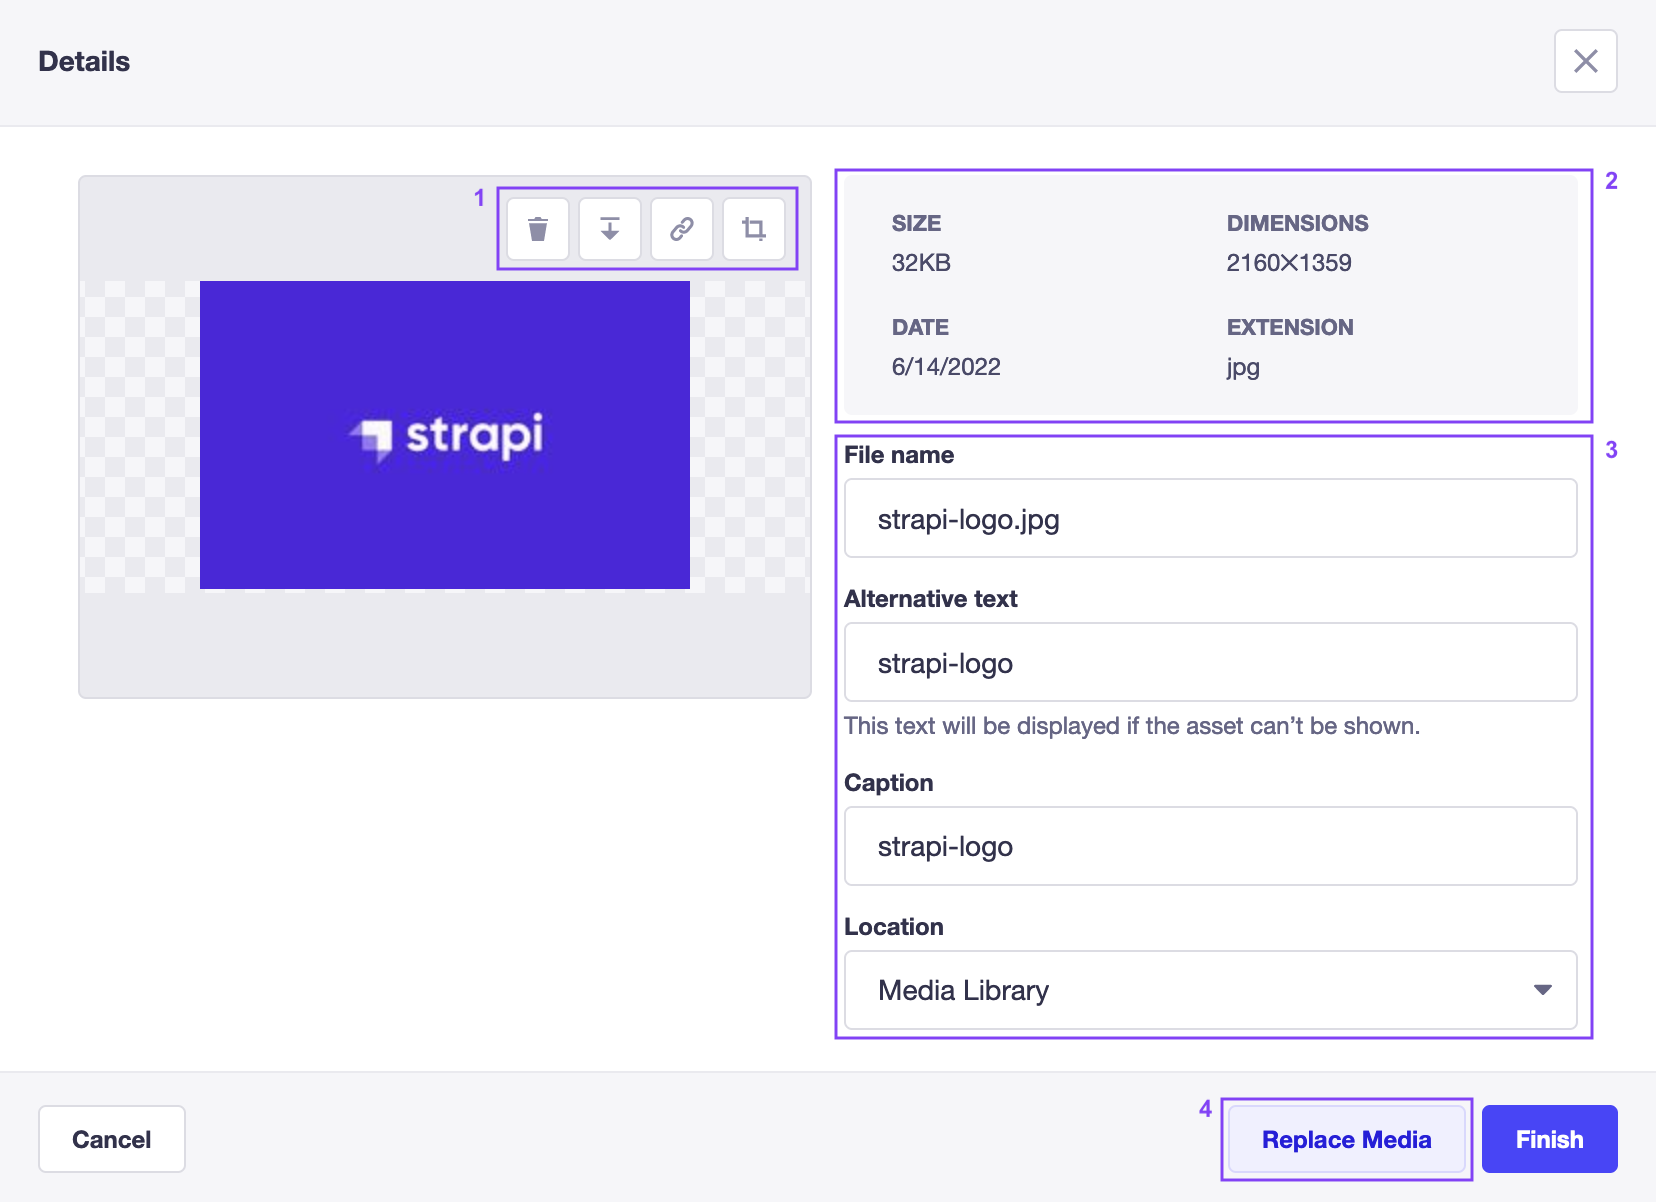
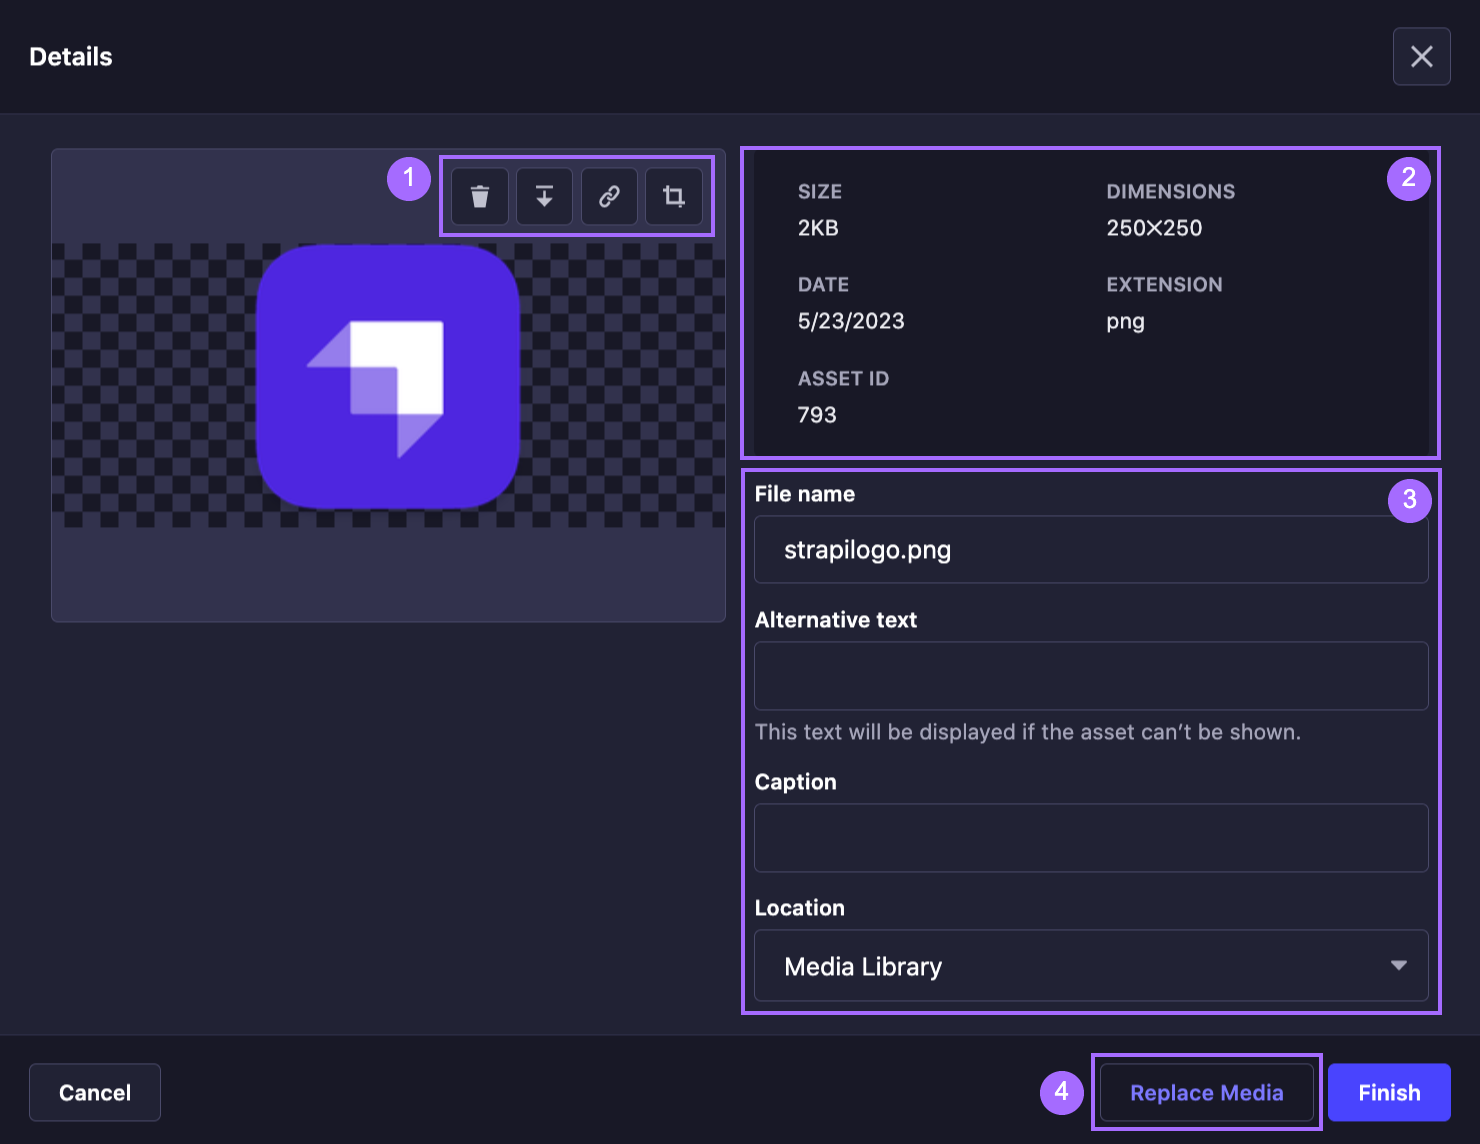
- On the left, above the preview of the asset, control buttons 1 allow performing various actions:
- click on the delete button to delete the asset,
- click on the download button to download the asset,
- click on the copy link button to copy the asset's link to the clipboard,
- optionally, click on the crop button to enter cropping mode for the image (see Cropping images).
- optionally, click on the pin button to enter focal point mode for the image (see Adding a focal point).
- On the right, meta data for the asset is displayed at the top of the window 2 and the fields below can be used to update the File name, Alternative text, Caption and Location (see Organizing assets with folders) for the asset 3.
- At the bottom, the Replace Media button 4 can be used to replace the asset file but keep the existing content of the other editable fields, and the Finish button is used to confirm any updates to the fields.
Moving assets
- Click on the edit button for the asset to be moved.
- In the window that pops up, click the Location field and choose a different folder from the drop-down list.
- Click Save to confirm.
Assets can also be moved to other folders from the main view of the Media Library (see Organizing assets with folders). This includes the ability to move several assets simultaneously.
Cropping images
- Click on the edit button for the asset to be cropped.
- In the window that pops up, click the crop button to enter cropping mode.
- Crop the image using handles in the corners to resize the frame. The frame can also be moved by drag & drop.
- Click the crop button to validate the new dimensions, and choose either to crop the original asset or to duplicate & crop the asset (i.e. to create a copy with the new dimensions while keeping the original asset untouched). Alternatively, click the stop cropping button to cancel and quit cropping mode.
- Click Finish to save changes to the file.
Adding a focal point
A focal point ensures the most important part of an image remains visible when the image is cropped or resized in different contexts.
To add a focal point to an image:
- Click on the edit button.
- In the window that pops up, click on the pin button to enter focal point mode.
- Move the crosshair to the desired location and click to set the focal point.
- Click the check button to validate the new focal point. Alternatively, click the cancel button to abandon changes and exit focal point mode.
- Click the reset button to reset the focal point to the center of the image.
- Click Finish to save changes to the file.
Deleting assets
- Click on the edit button for the asset to be deleted.
- In the window that pops up, click the delete button in the control buttons bar above the asset's preview.
- Click Confirm.
Assets can also be deleted individually or in bulk from the main view of the Media Library. Select assets by clicking on their checkbox in the top left corner, then click the Delete icon at the top of the window, below the filters and sorting options.
Organizing assets with folders
Folders in the Media Library help you organize uploaded assets. Folders sit at the top of the Media Library view or are accessible from the Media field popup when using the Content Manager.
From the Media Library, it is possible to view the list of folders and browse a folder's content, create new folders, edit an existing folder, move assets to a folder, and delete a folder.
Folders follow the permission system of assets (see Users & Permissions feature). It is not yet possible to define specific permissions for a folder.
By default, the Media Library displays folders and assets created at the root level. Clicking a folder navigates to this folder, and displays the following elements:
- the folder title and breadcrumbs to navigate to a parent folder 1
- the subfolders 2 the current folder contains
- all assets 3 from this folder
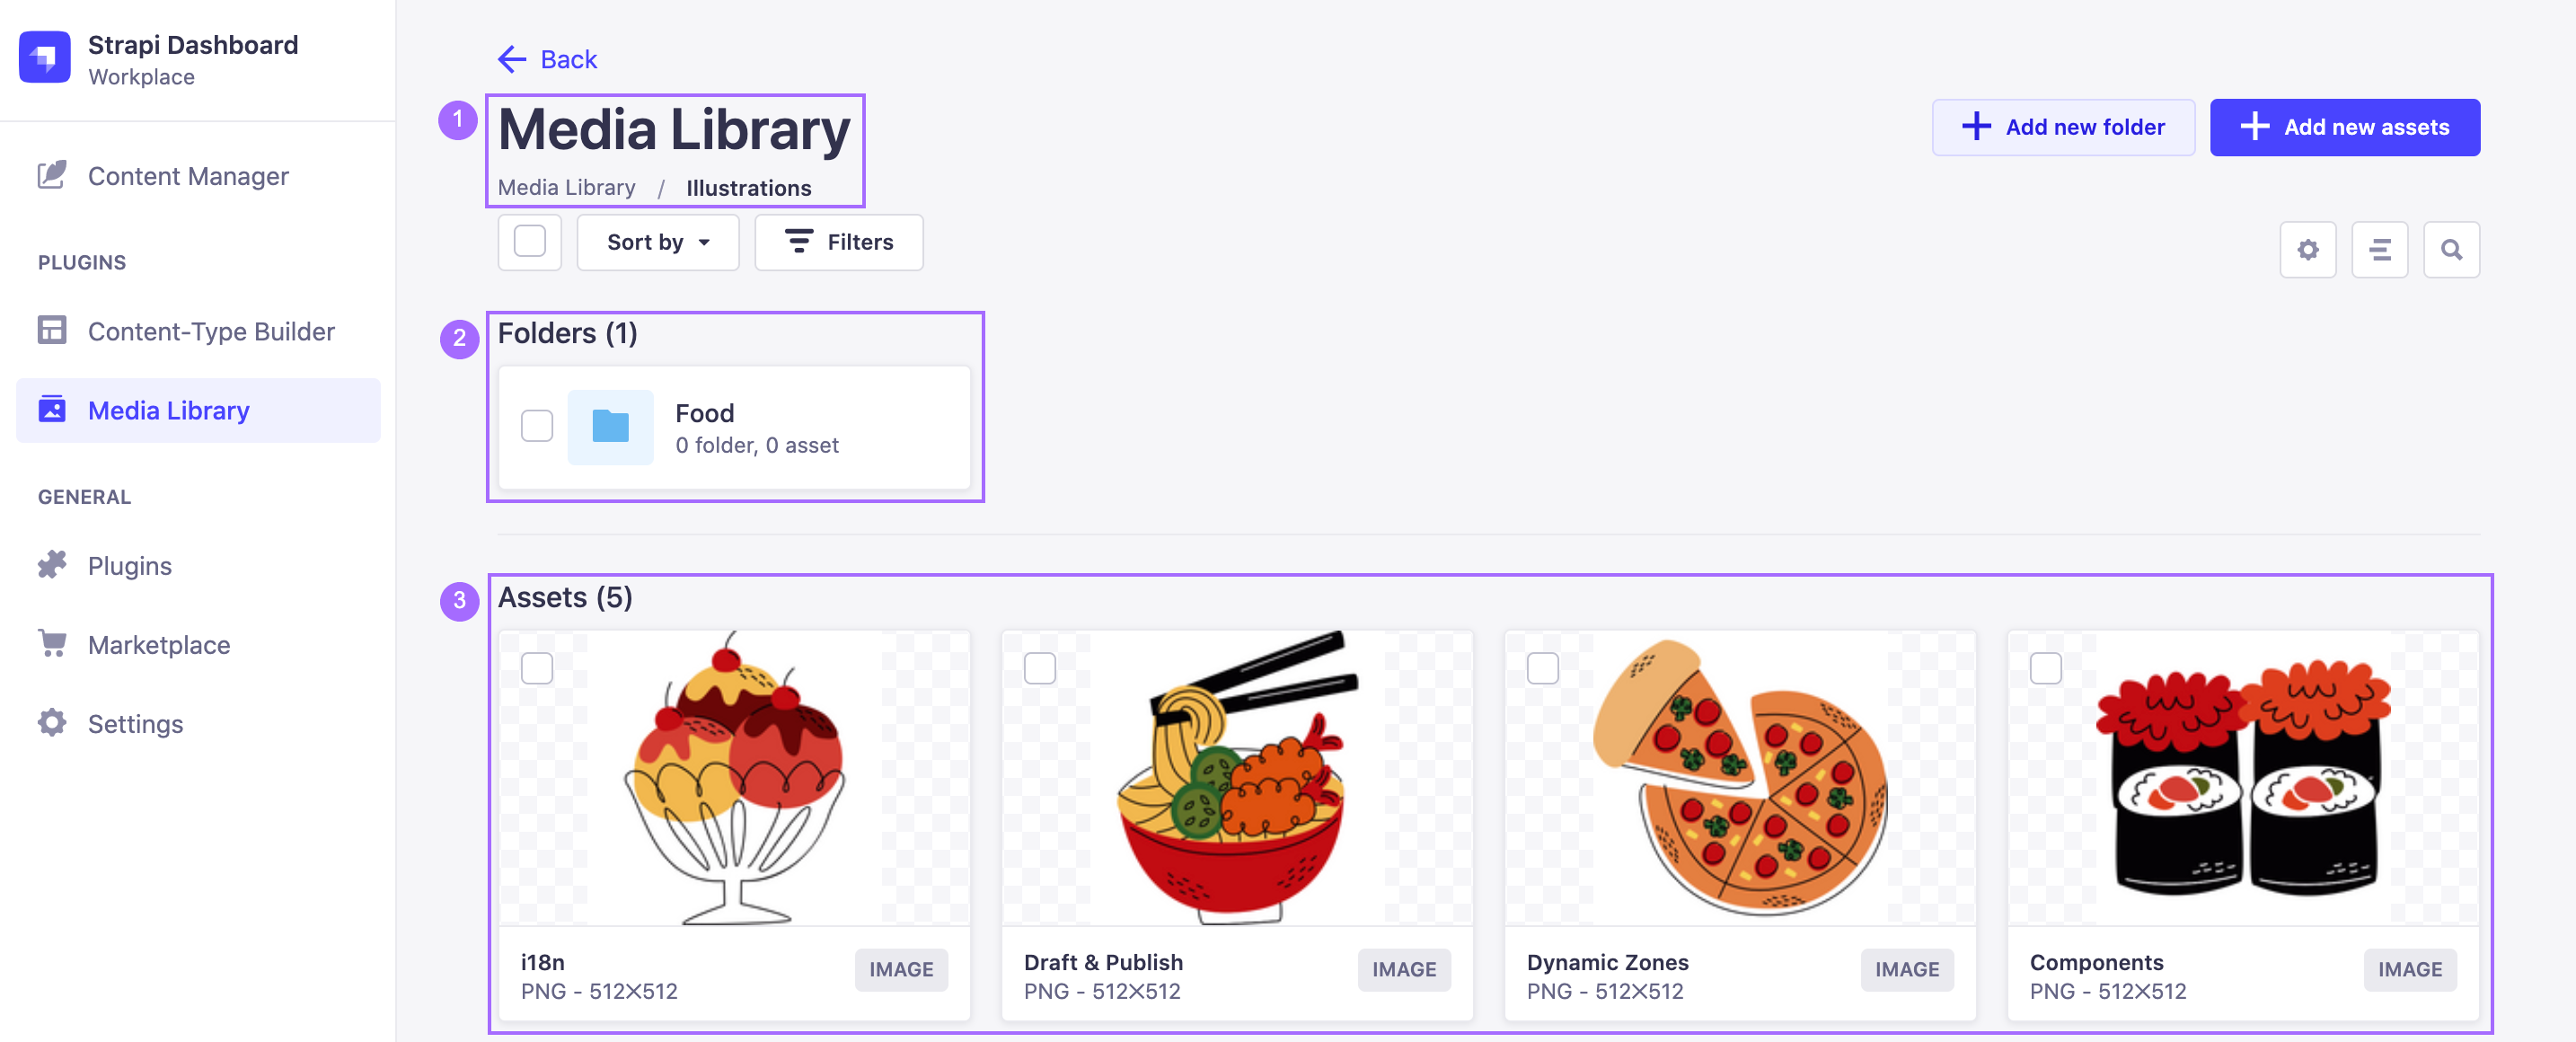
From this dedicated folder view, folders and assets can be managed, filtered, sorted and searched just like from the main Media Library.
To navigate back to the parent folder, one level up, use the Back button at the top of the interface.
The breadcrumb navigation can also be used to go back to a parent folder: click on a folder name to directly jump to it or click on the 3 dots /img. and select a parent folder from the drop-down list.
Adding folders
- Click on Add new folder in the upper right of the Media Library interface.
- In the window that pops up, type a name for the new folder in the Name field.
- (optional) In the Location drop-down list, choose a location for the new folder. The default location is the active folder.
- Click Create.
There is no limit to how deep your folders hierarchy can go, but bear in mind it might take some effort to reach a deeply nested subfolder, as the Media Library currently has no visual hierarchy indication. Searching for files using the on the right side of the user interface might be a faster alternative to finding the asset you are looking for.
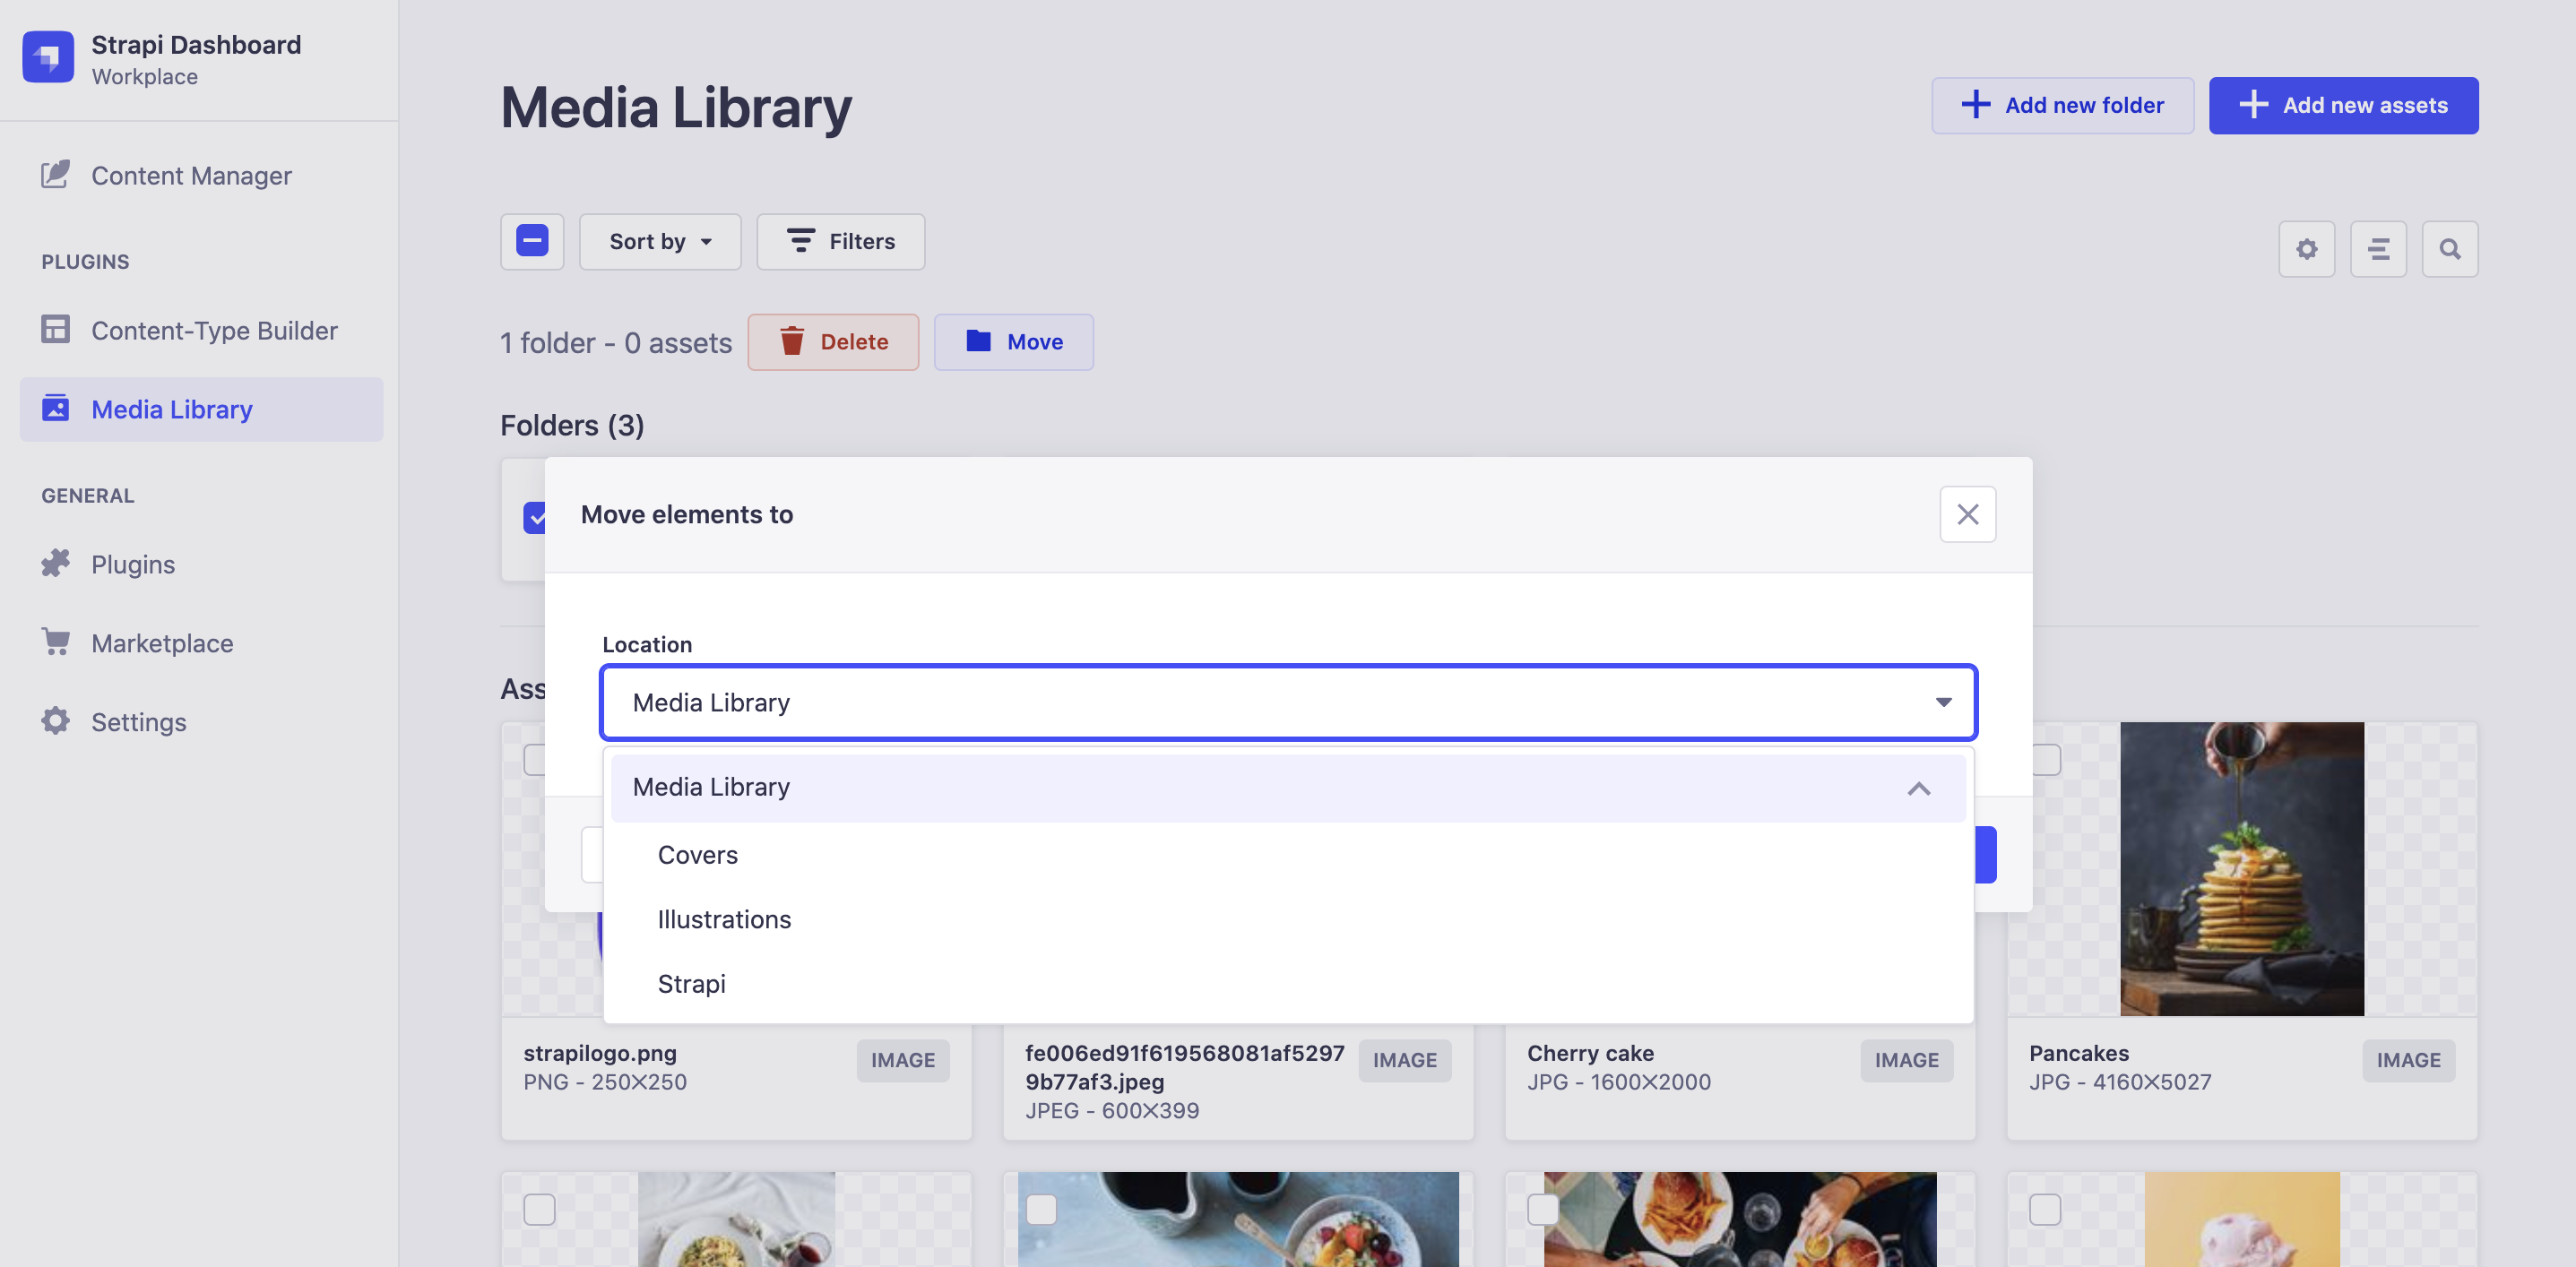
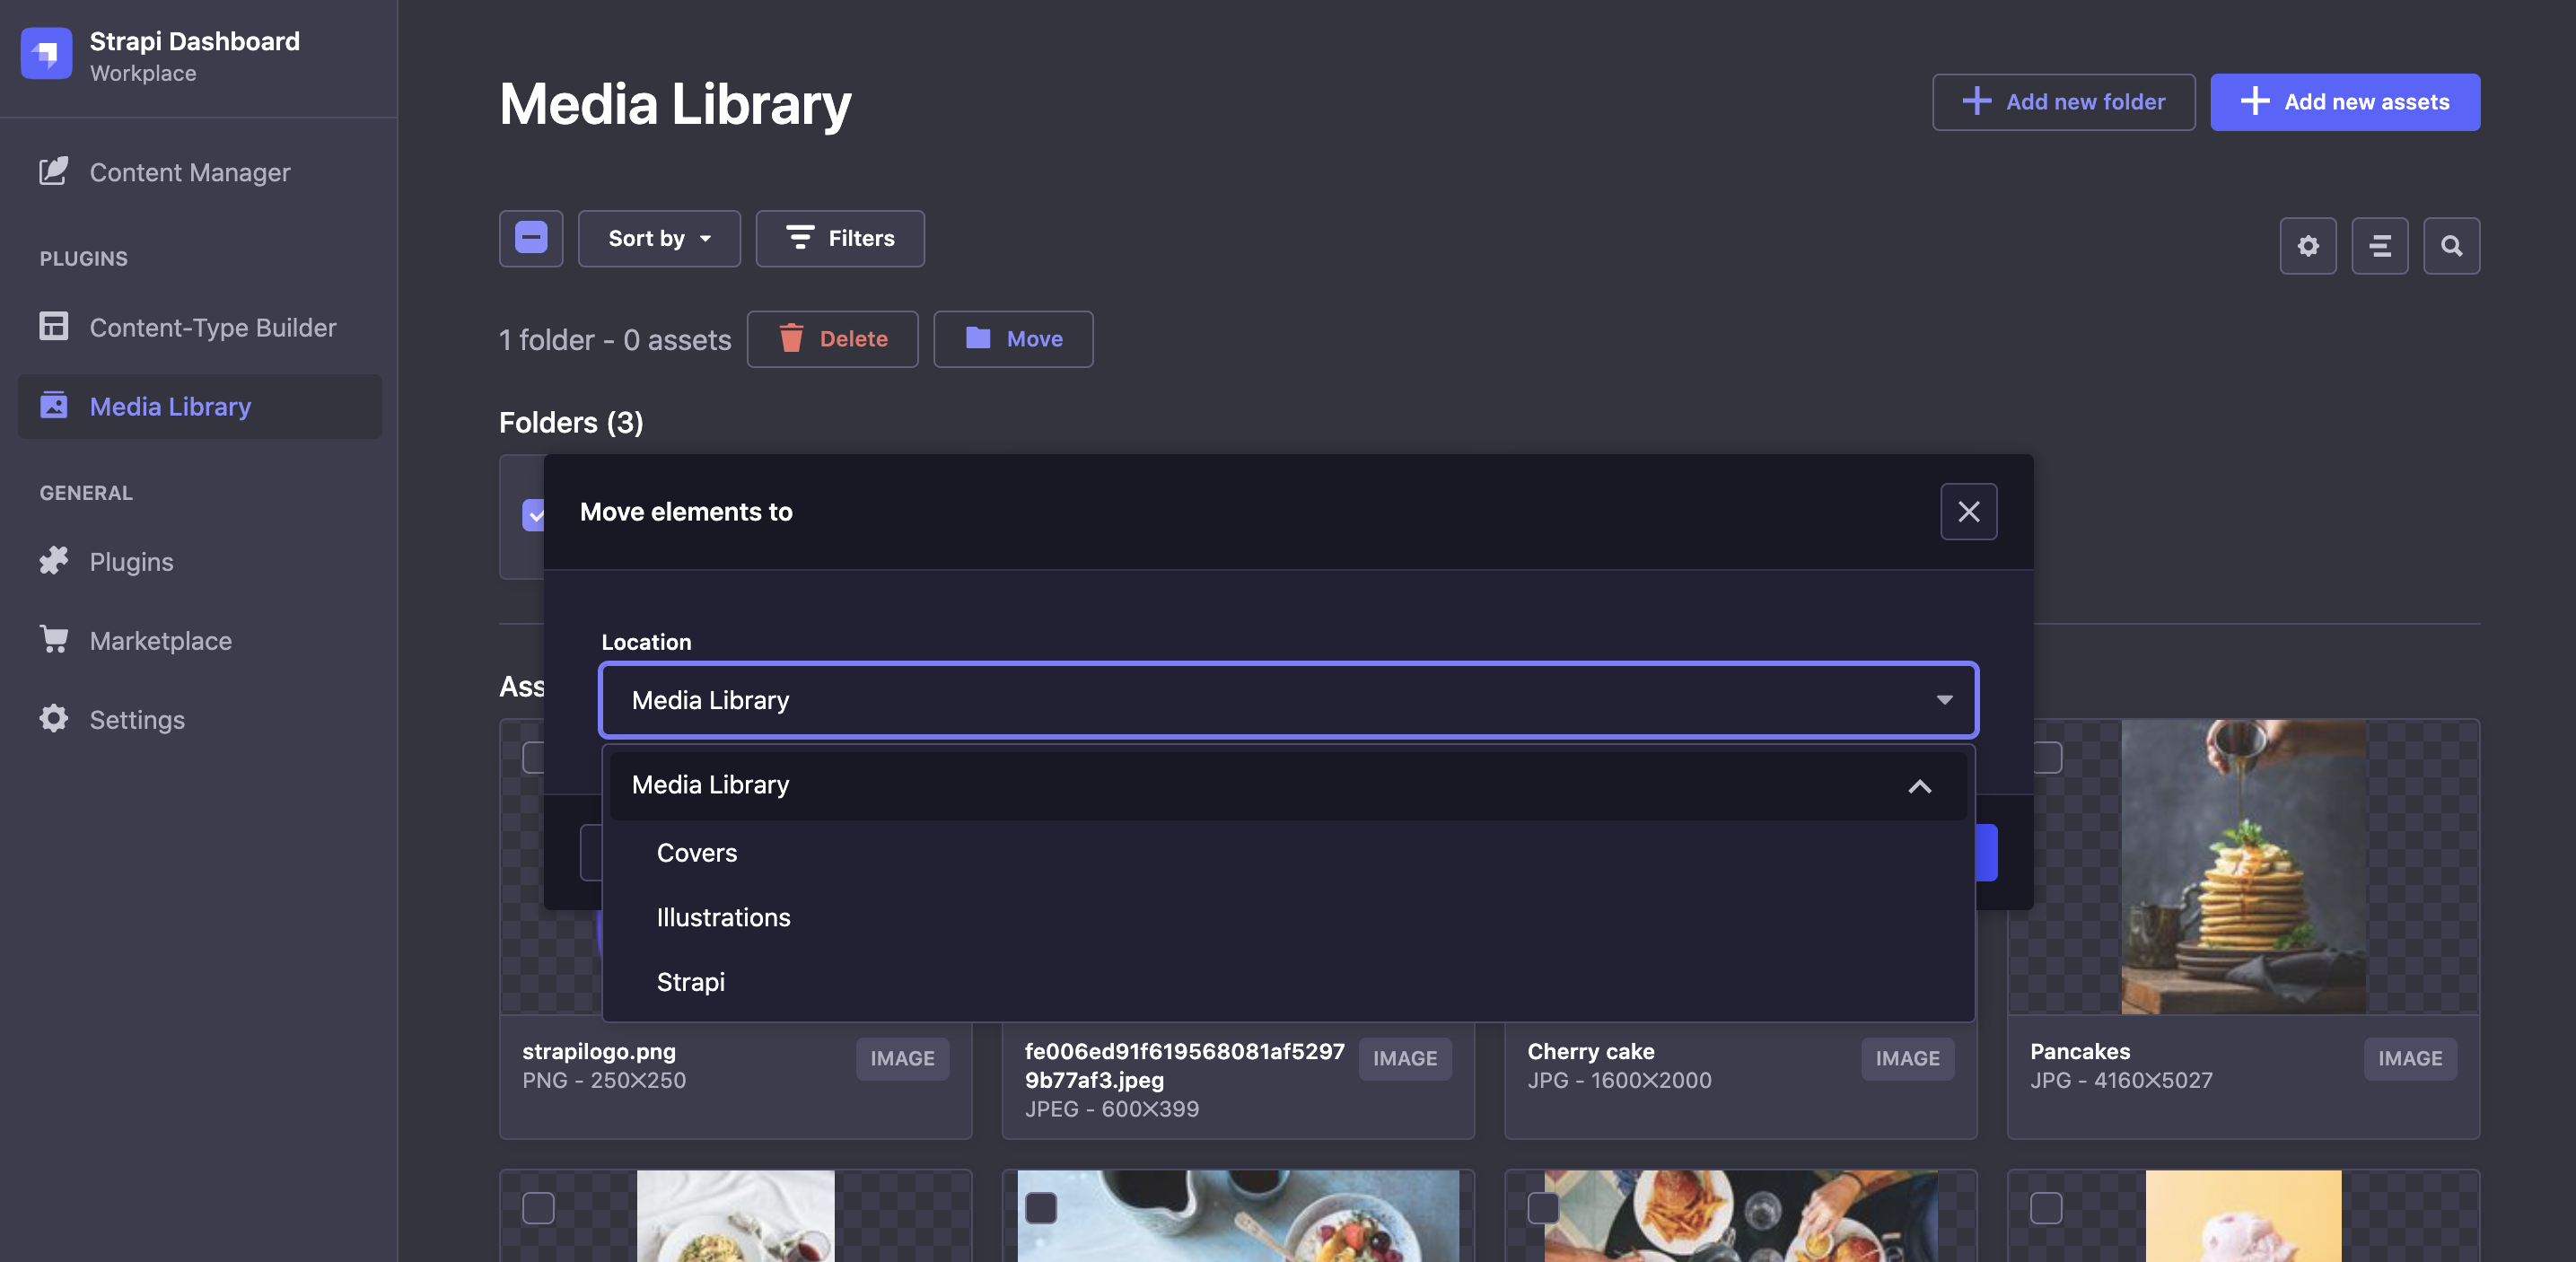
Moving assets to a folder
Assets and folders can be moved to another folder from the root view of the Media Library or from any view for a dedicated folder.
- Select assets and folder to be moved, by clicking the checkbox on the left of the folder name or clicking the asset itself.
- Click the Move button at the top of the interface.
- In the Move elements to pop-up window, select the new folder from the Location drop-down list.
- Click Move.
Editing folders
Once created, a folder can be renamed, moved or deleted.
- In the Folders part of the Media library, hover the folder to be edited and click its edit button .
- In the window that pops up, update the name and location with the Name field and Location drop-down list, respectively.
- Click Save.
Deleting folders
Deleting a folder can be done either from the list of folders of the Media Library, or when editing a single folder.
- Click the checkbox on the left of the folder name. Multiple folders can be selected.
- Click the Delete button above the Folders list.
- In the Confirmation dialog, click Confirm.
A single folder can also be deleted when editing it: hover the folder, click on its edit icon , and in the window that pops up, click the Delete folder button and confirm the deletion.
Usage with the REST API
The Media Library feature has some endpoints that can accessed through Strapi's REST API:
Use public assets in your code
Public assets are static files (e.g., images, video, CSS files, etc.) that you want to make accessible to the outside world.
Because an API may need to serve static assets, every new Strapi project includes by default a folder named /public. Any file located in this directory is accessible if the request's path doesn't match any other defined route and if it matches a public file name (e.g. an image named company-logo.png in ./public/ is accessible through /company-logo.png URL).
index.html files are served if the request corresponds to a folder name (/pictures url will try to serve public/pictures/index.html file).
The dotfiles are not exposed. It means that every file name that starts with ., such as .htaccess or .gitignore, are not served.